Introduction
In today’s rapidly evolving AI landscape, conversational agents have become increasingly sophisticated, transitioning from simple text-based interactions to more natural, voice-enabled experiences. This blog post explores how to create an intelligent chatbot that not only understands and responds to text input but also speaks its responses aloud – all without writing a single line of code.
By combining the power of Large Language Models (LLMs) with advanced Text-to-Speech (TTS) technology, we can create a versatile voice assistant similar to platforms like ChatGPT Voice, but customized to our specific needs. We’ll build this entire solution using n8n, an open-source workflow automation platform that makes connecting powerful APIs accessible to everyone, regardless of coding experience.
Our solution integrates three key technologies:
- n8n: A powerful workflow automation tool that serves as the backbone of our project, connecting all components through a visual interface
- OpenAI: Providing the conversational intelligence through their language models
- ElevenLabs: Delivering realistic, natural-sounding voice synthesis for our chatbot’s responses
Whether you’re looking to enhance customer service applications, create accessible content, or develop educational tools, this integration opens up exciting possibilities. By the end of this guide, you’ll have a functional prototype that demonstrates how these technologies can work together seamlessly.
Understanding the Components
n8n: The Workflow Automation Platform
At the heart of our voice-enabled chatbot is n8n, a powerful open-source workflow automation tool. Unlike traditional coding environments, n8n provides a visual interface where you can connect various services and APIs through a node-based system. Think of it as building blocks that you can arrange and connect to create complex workflows without writing code.
n8n serves as the orchestrator in our project, managing the flow of information between the user interface, the language model, and the text-to-speech service.
OpenAI API: The Brain Behind Conversations
The intelligence of our chatbot comes from OpenAI’s language models. For this chatbot, we’re using OpenAI’s GPT models through their API to:
- Process and understand user inputs
- Generate contextually relevant and helpful responses
- Format outputs appropriately for text-to-speech conversion
ElevenLabs: Bringing Voice to Text
The final piece of our solution is ElevenLabs, a cutting-edge text-to-speech platform that transforms our AI-generated text responses into natural-sounding speech. Unlike robotic-sounding voices of the past, ElevenLabs provides remarkably human-like voices with proper intonation, emphasis, and natural cadence.
ElevenLabs offers multiple voice options with different tones and characteristics and support for various languages and accents. By integrating ElevenLabs, we elevate our chatbot from a text-based experience to an engaging voice interaction, making the technology more accessible and natural to use.
How These Components Work Together

This seamless flow creates a complete conversation cycle – from user text input to AI-generated voice output – all orchestrated through n8n’s visual workflow system without requiring any coding.
Setting Up Your Environment
Before diving into building our chatbot workflow, we need to set up the necessary accounts and gather API credentials. This section walks you through the prerequisites and initial setup process.
Requirements
To follow along with this tutorial, you’ll need:
- An n8n instance: You can either use n8n Cloud for the simplest setup or install n8n locally. The cloud version offers the advantage of public HTTPS endpoints, which can be helpful if you later want to extend your chatbot to platforms like Telegram.
- OpenAI API Key: Sign up for an account at OpenAI’s platform and create an API key. As of May 2025, you’ll need a paid account to access the API services, but the costs for this project should be minimal.
- ElevenLabs API Key: Create an account at ElevenLabs and generate an API key from your profile settings. ElevenLabs offers a free tier that’s sufficient for testing this project.
Installation and Configuration
If you’re using n8n Cloud, you can skip the installation steps. For a local installation:
1. Install n8n use Docker
docker run -it --rm \
  --name n8n \
  -p 5678:5678 \
  -v ~/.n8n:/home/node/.n8n \
  n8nio/n8n
2. Start n8n
n8n startThis makes the n8n interface available at http://localhost:5678
Managing API Keys Securely
When working with API keys in n8n, it’s important to use credentials management rather than hardcoding keys into your workflows:
- In the n8n interface, go to Settings → Credentials
- Create a new credential for OpenAI:
- Select “OpenAI API” as the type
- Enter your API key
- Save the credential
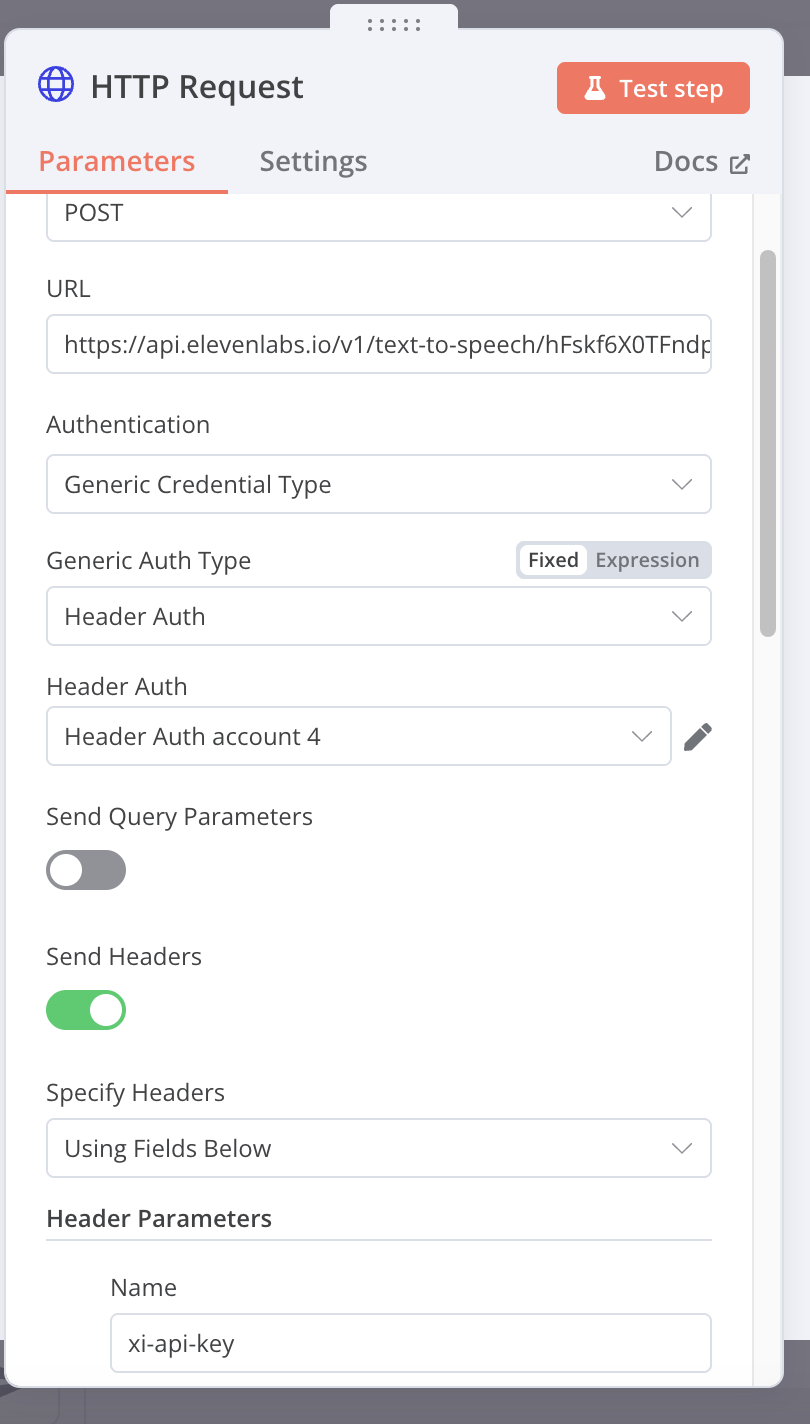
- For ElevenLabs, create a custom API Key credential:
- Select “HTTP Request Auth” as the type
- Choose “Header Auth” as the authentication method
- Set the header name to
xi-api-key - Enter your ElevenLabs API key as the value


These stored credentials can then be securely referenced in your workflow nodes without exposing the actual keys.
Preparing Your Workspace
With everything installed and your API keys set up, let’s create a new workflow:

- In the n8n interface, go to Workflows and click + Create new workflow
- Name your workflow “LLM Text-to-Speech Chatbot”
- Click Save to create the workflow
Now you have a blank canvas where we’ll build our chatbot’s logic in the next section. With our environment properly configured, we’re ready to start connecting the components that will bring our voice-enabled chatbot to life.
Building the Workflow Step-by-Step
Now that we have our environment set up, let’s build our LLM chatbot with text-to-speech capabilities. We’ll create a workflow in n8n that connects all the necessary components to receive user input, process it through an LLM, convert the response to speech, and return both text and audio to the user.
Step 1: Creating the Chat Trigger Node
The Chat Trigger node serves as the entry point for our workflow, providing a user interface where people can interact with our chatbot.

- Add the Chat Trigger node:
- In your blank workflow, click “Add first step” or press Tab
- Search for “Chat Trigger” and select it
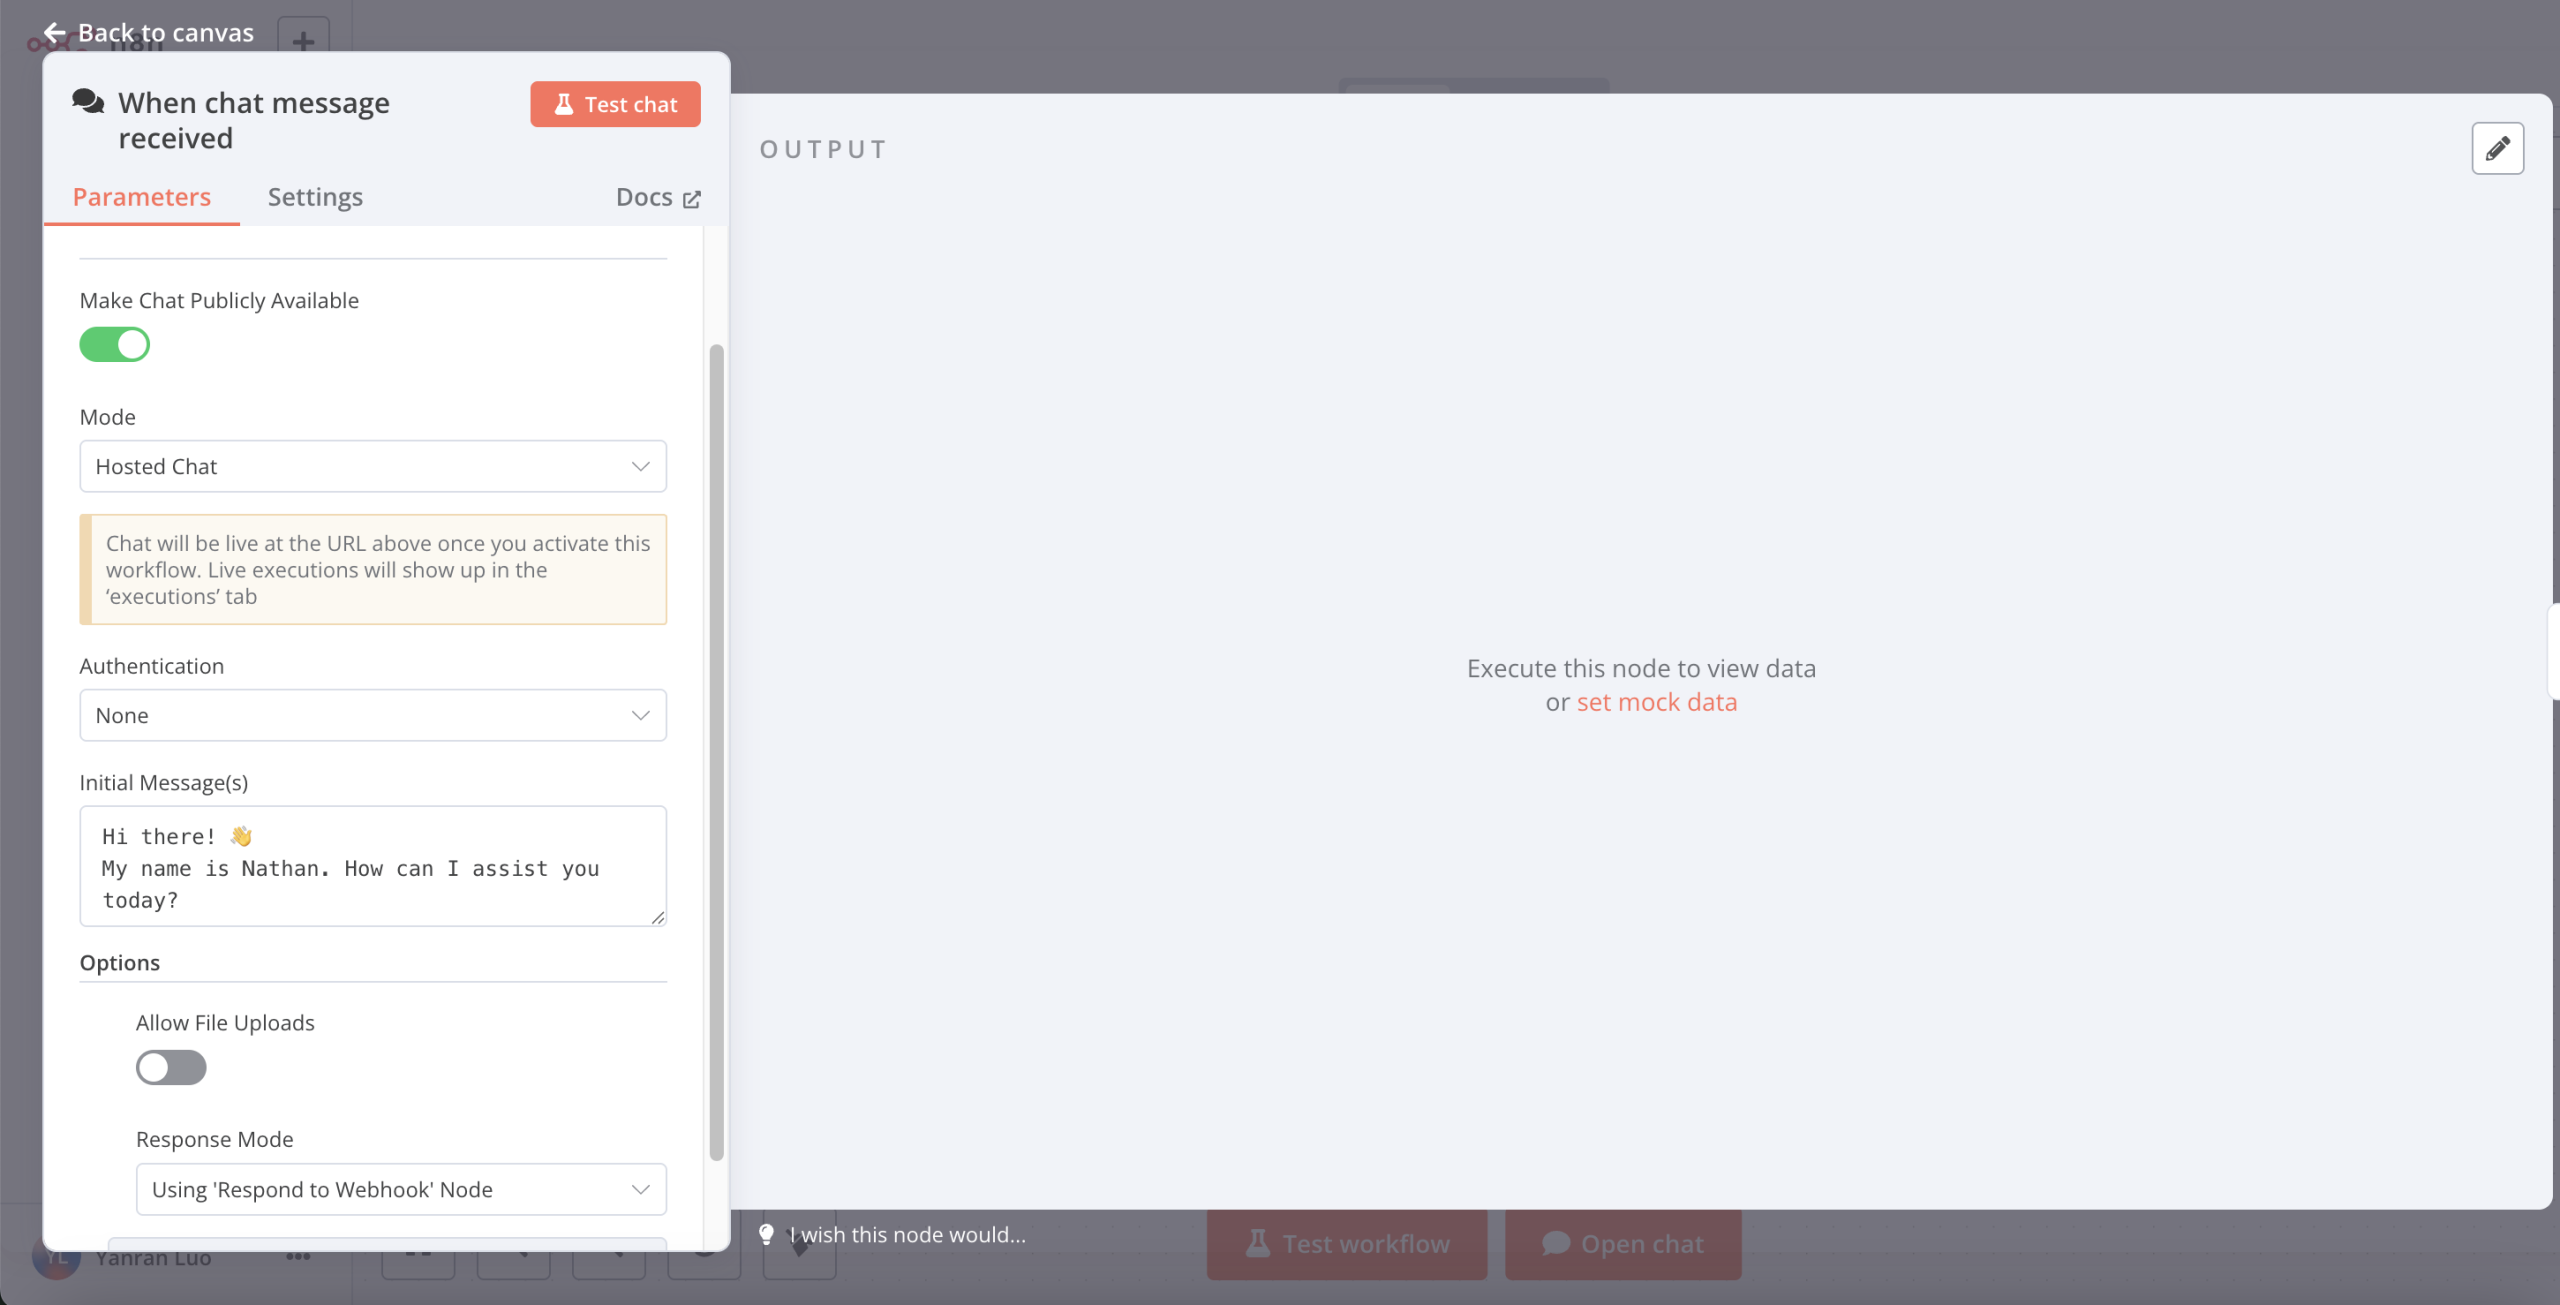
- Configure the Chat Trigger settings:
- Set “Make Chat Publicly Available” to ON (toggle the switch)
- Mode: Select “Hosted Chat” for simplicity
- Authentication: Choose “None” for this demo (you can add authentication later)
- Initial Message(s): Add a welcoming message like “Hello! I’m a voice-enabled AI assistant. How can I help you today?”
- Optional: Enable file uploads:
- If you want to allow users to upload files, toggle on “Allow File Uploads”
- Note that processing uploaded files requires additional nodes that we won’t cover in this basic setup
- Set Response Mode:
- Set “Respond” to “Using ‘Respond to Webhook’ Node”
- This allows us to control exactly what gets returned to the chat interface
The Chat Trigger node provides a built-in interface where users can type messages and see responses. When activated, it generates a unique URL that anyone can use to access your chatbot.
Step 2: Integrating the OpenAI LLM
Next, we’ll add the OpenAI node to process user messages and generate intelligent responses.

- Add the OpenAI node:
- Click the “+” button after your Chat Trigger node
- Search for “OpenAI” and select it
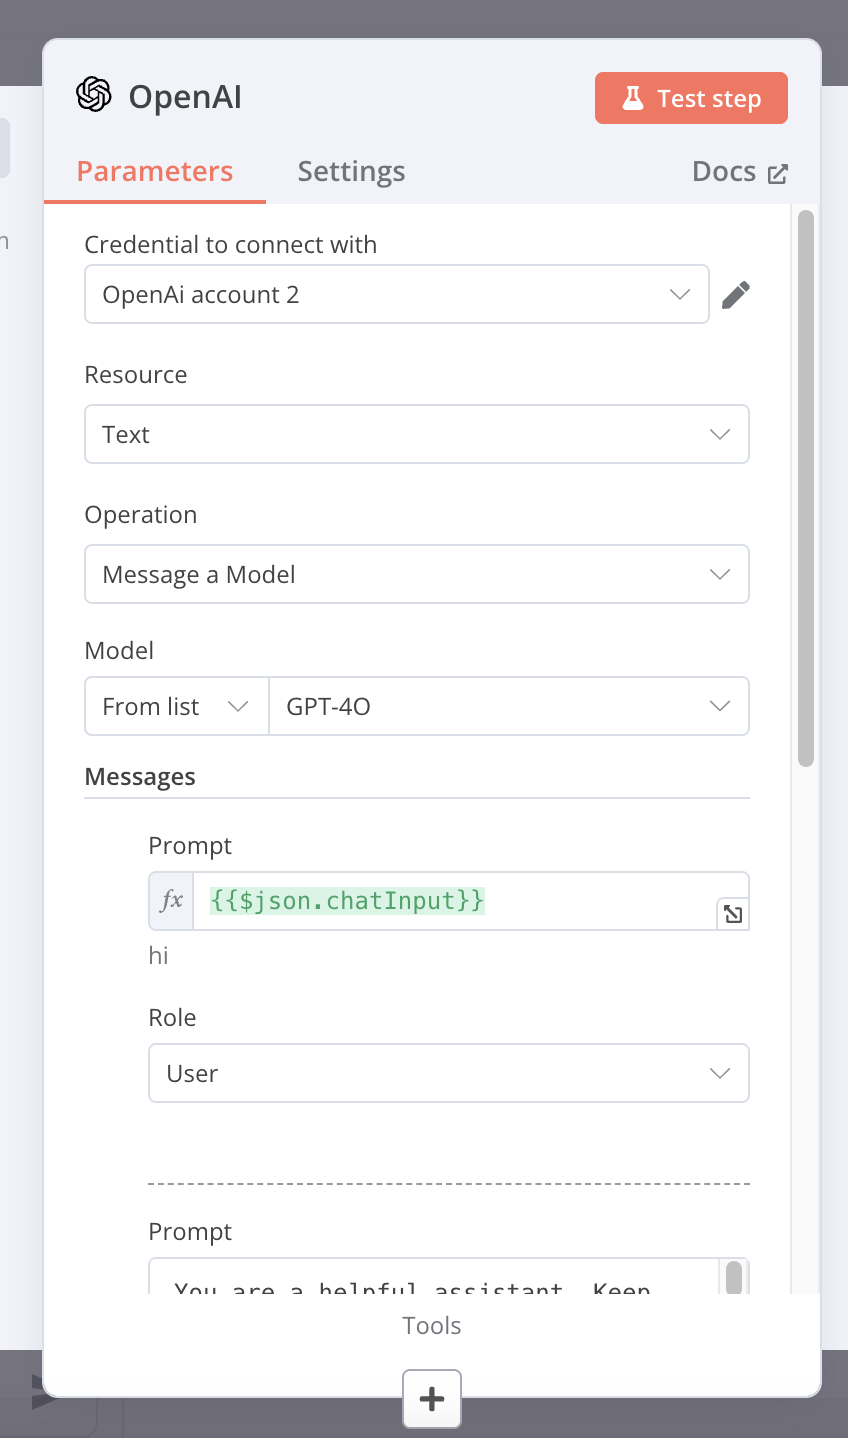
- Configure the OpenAI node:
- Operation: “Message a Model”
- Model: Select “GPT-4” or “GPT-3.5-Turbo” based on your preference (here we use newer models like GPT-4o)
- Messages:
- Add a User message with the expression:
{{$json.chatInput}} - Add a System message: “You are a helpful assistant providing concise responses ideal for text-to-speech conversion.”
- Add a User message with the expression:
- Temperature: Set to 0.7 (adjust based on how creative you want responses to be)
- Credentials: Select the OpenAI credentials you created earlier
The OpenAI node takes the user’s input from the Chat Trigger and generates a natural language response using the specified model.
Step 3: Processing the Text Output
Now we need to extract and format the text response from OpenAI to prepare it for the text-to-speech conversion.
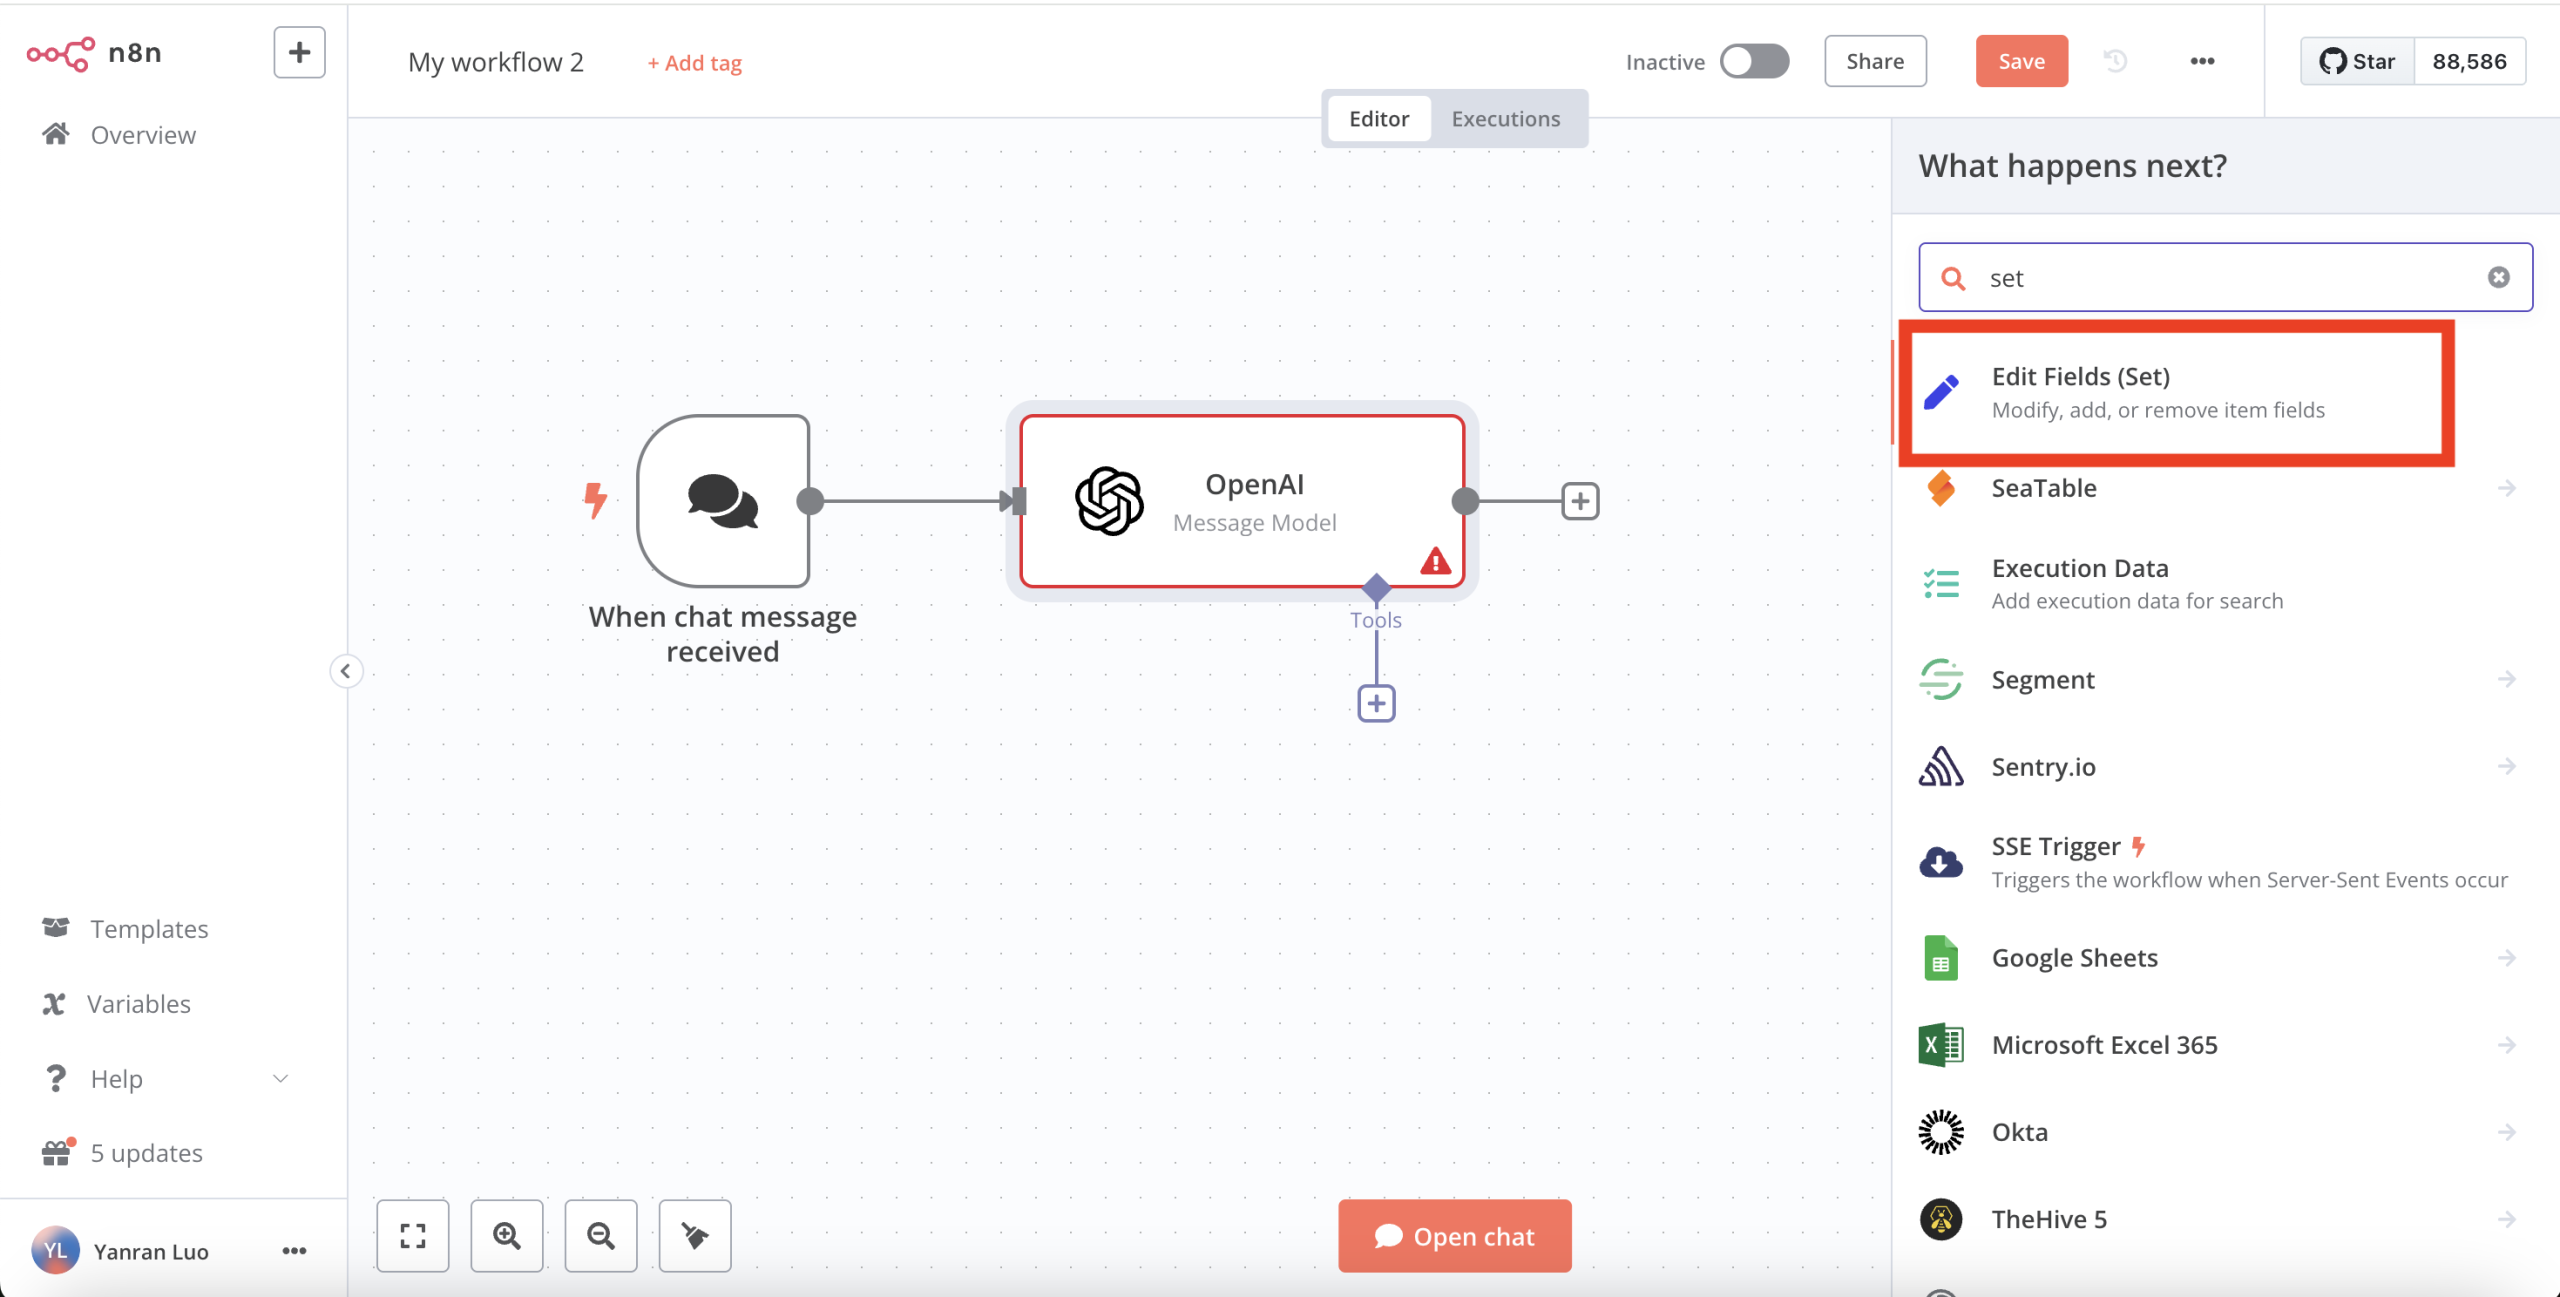

- Add an Edit Fields node:
- Click the “+” button after your OpenAI node
- Search for “Edit Fields” (or “Set”) and select it
- Configure the Edit Fields node:
- Mode: “Manual Mapping”
- Add a field named “text”
- Set its value to:
{{$node["OpenAI"].json.choices[0].message.content}} - This extracts just the text content from OpenAI’s response
This step ensures we have a clean text response ready for the text-to-speech service.
Step 4: Converting Text to Speech with ElevenLabs
Now for the most crucial part – converting our text response to speech using ElevenLabs.

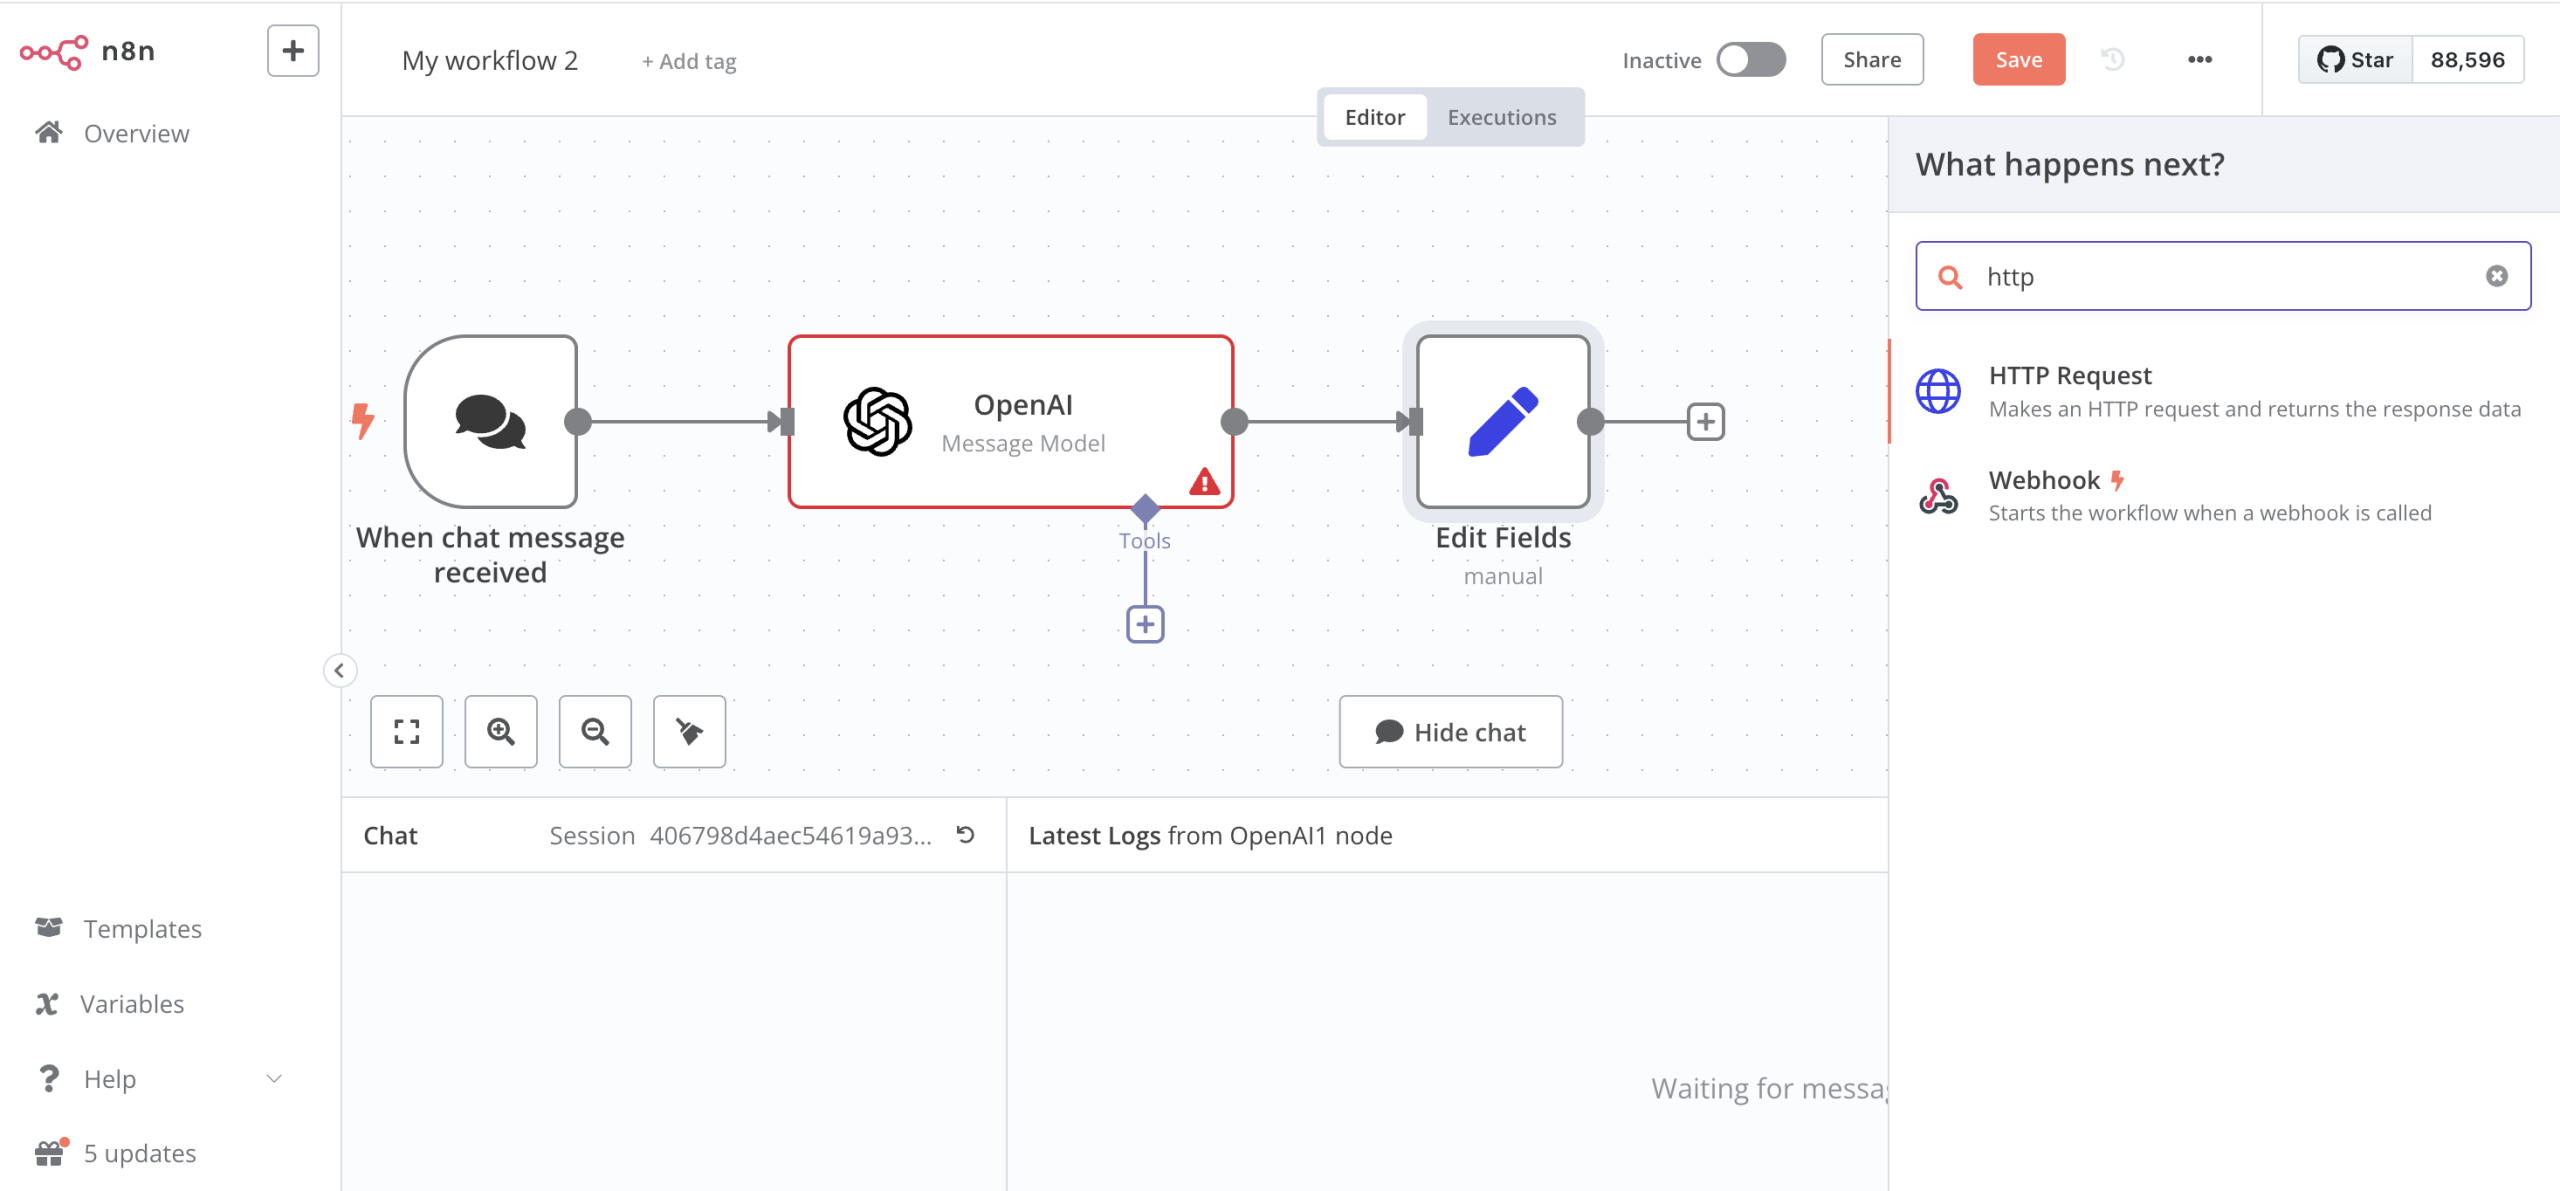
- Add an HTTP Request node:
- Click the “+” button after your Edit Fields node
- Search for “HTTP Request” and select it
- Configure the HTTP Request node:
- Method: POST
- URL:
https://api.elevenlabs.io/v1/text-to-speech/{voice_id}- Replace
{voice_id}with your preferred voice ID from ElevenLabs
- Replace
- Authentication: Select the ElevenLabs credential you created earlier
- Headers:
- Name: “Content-Type”
- Value: “application/json”
- Body:
- Content Type: JSON
- Add Parameter:
- Name: “text”
- Value:
{{$node["Edit Fields"].json.text}}
- Add Parameter (optional):
- Name: “model_id”
- Value: “eleven_monolingual_v1” (or your preferred model)
This node sends our text to ElevenLabs and receives an audio file in response.
Step 5: Returning Responses to the User
Finally, we need to send both the text and an indication about the audio back to the user.
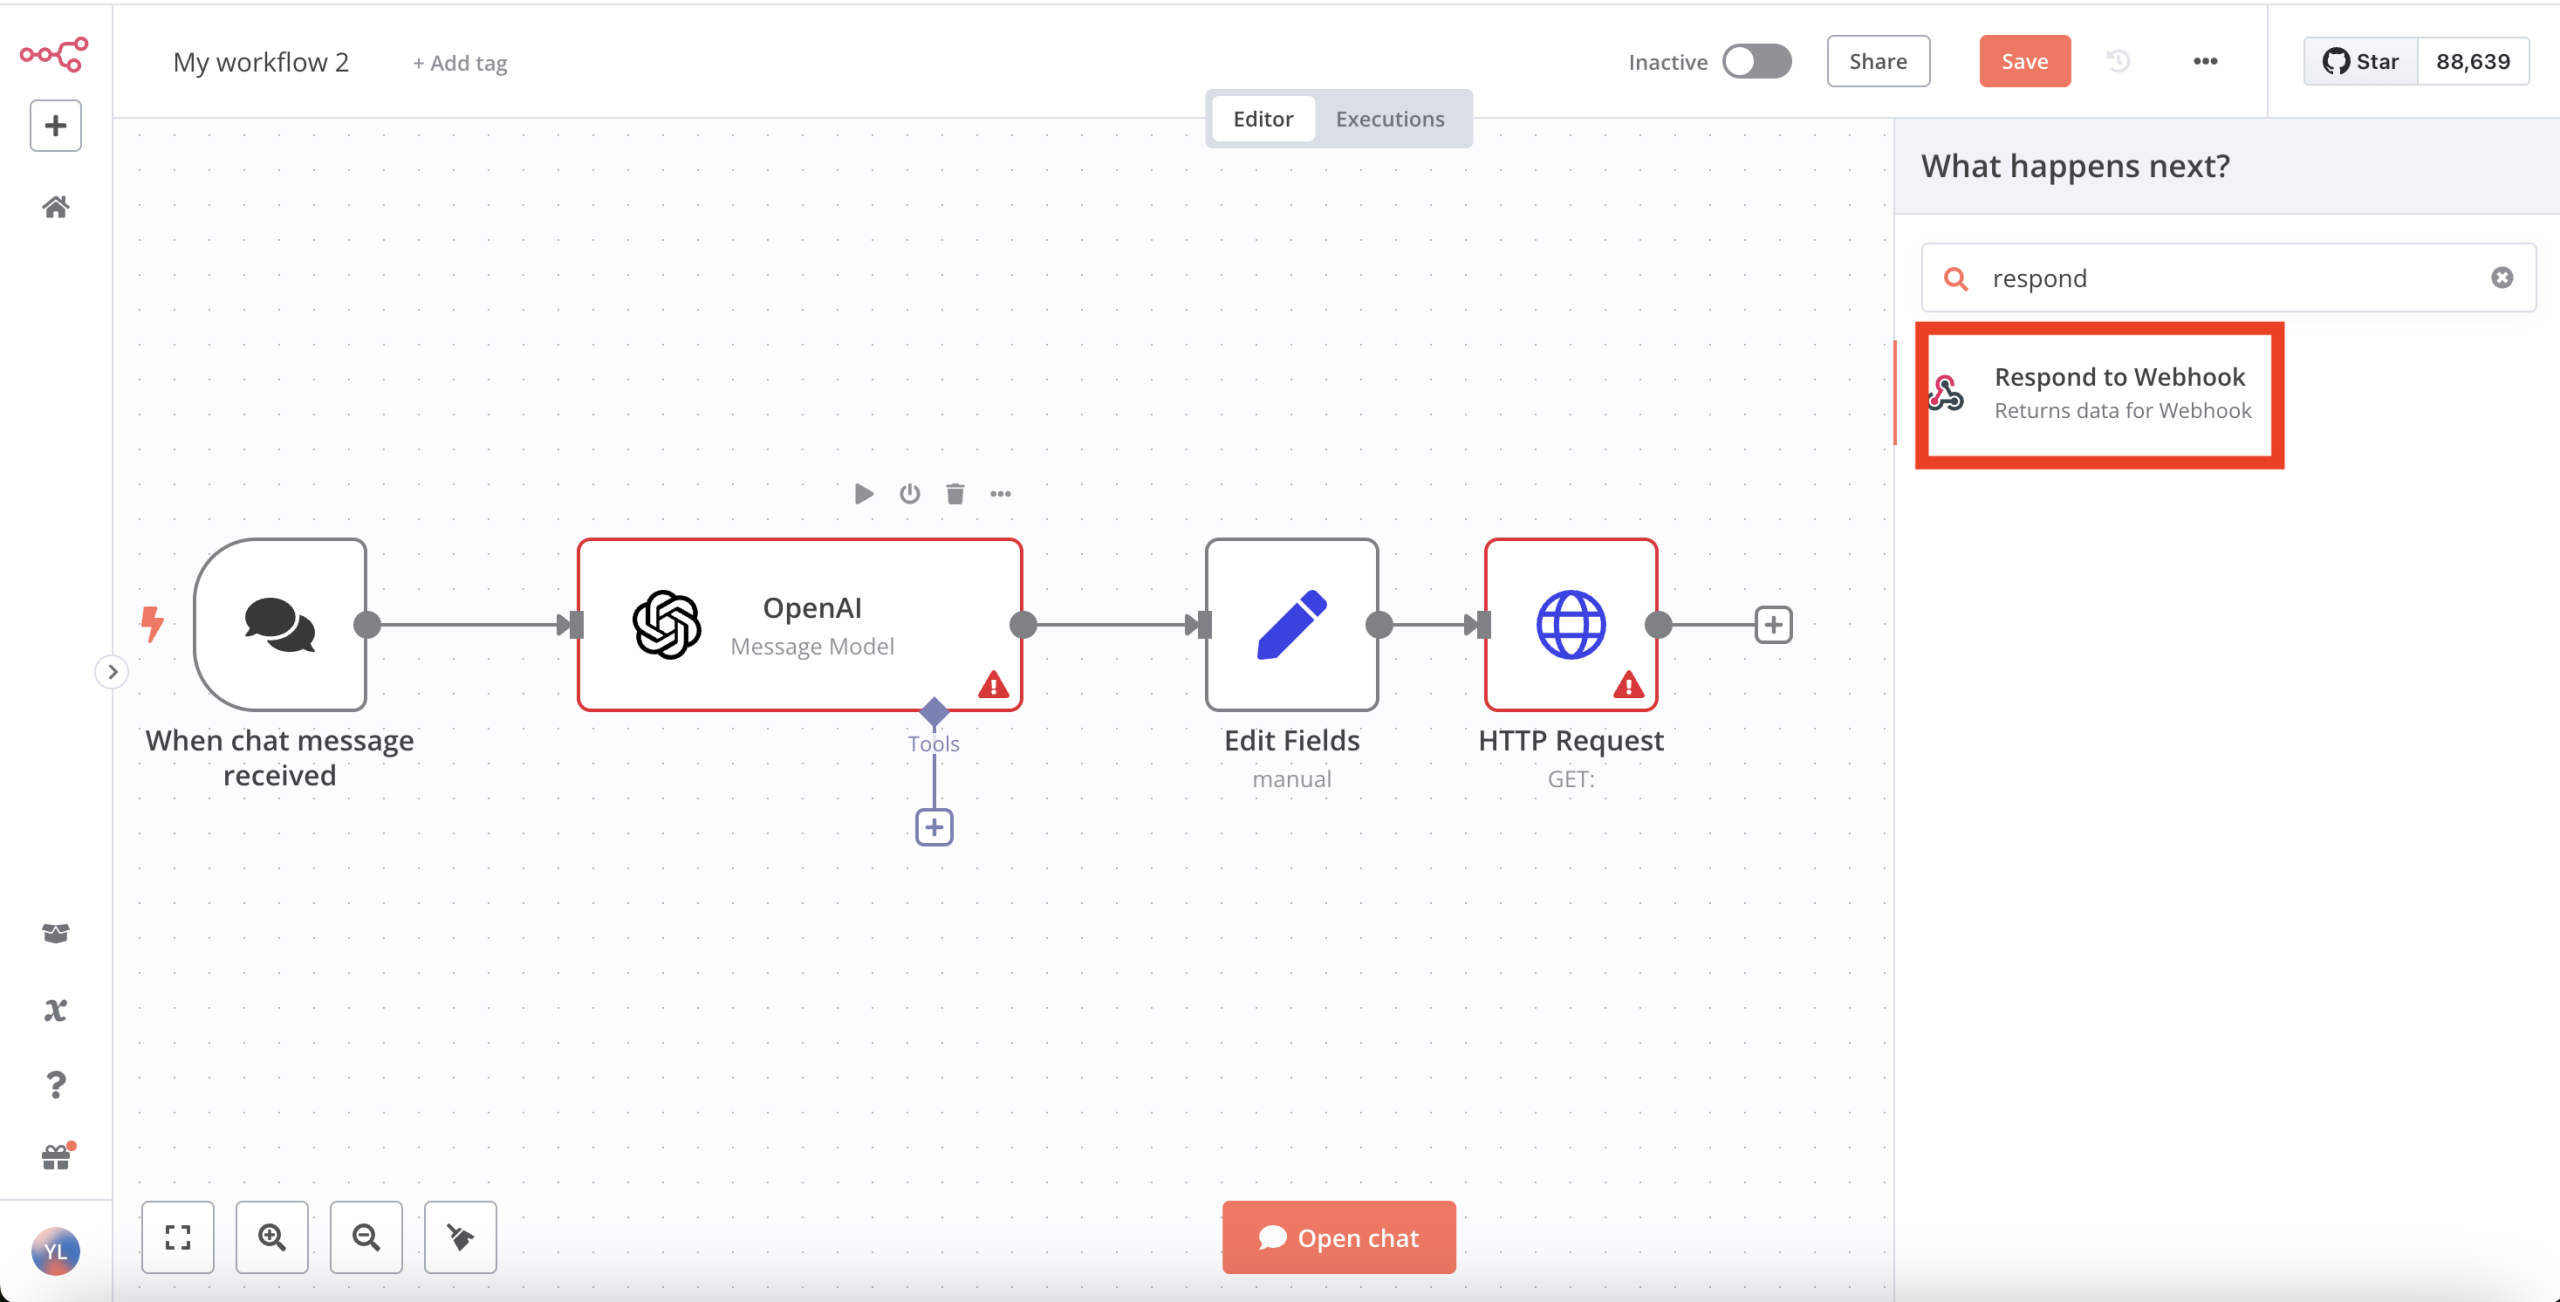

- Add a Respond to Webhook node:
- Click the “+” button after your HTTP Request node
- Search for “Respond to Webhook” and select it
- Configure the Respond to Webhook node:
- Respond With: “JSON”
- Content-Type: “application/json”
- Response Body: json
{ "text": "{{$node[\"Edit Fields\"].json.text}}\n\n(Audio response has also been generated.)" }
- Save and activate your workflow:
- Click “Save” in the top-right corner
- Toggle the “Active” switch to enable your workflow
Your LLM chatbot with text-to-speech is now complete!


When a user sends a message through the chat interface, it will:
- Process the message with OpenAI to generate a text response
- Convert that text to speech using ElevenLabs
- Return the text response to the user with a note about the audio generation
In a production environment, you would likely want to enhance this basic workflow with additional features like error handling, conversation memory, and a way to deliver the audio response directly to the user. However, this setup provides a solid foundation that demonstrates the core concept.
Challenges and Enhancements
While building an LLM chatbot with text-to-speech capabilities in n8n is relatively straightforward, you may encounter several challenges along the way. moreover, with basic LLM chatbot up and running, let’s explore ways to enhance its functionality and make it more powerful for real-world scenarios.
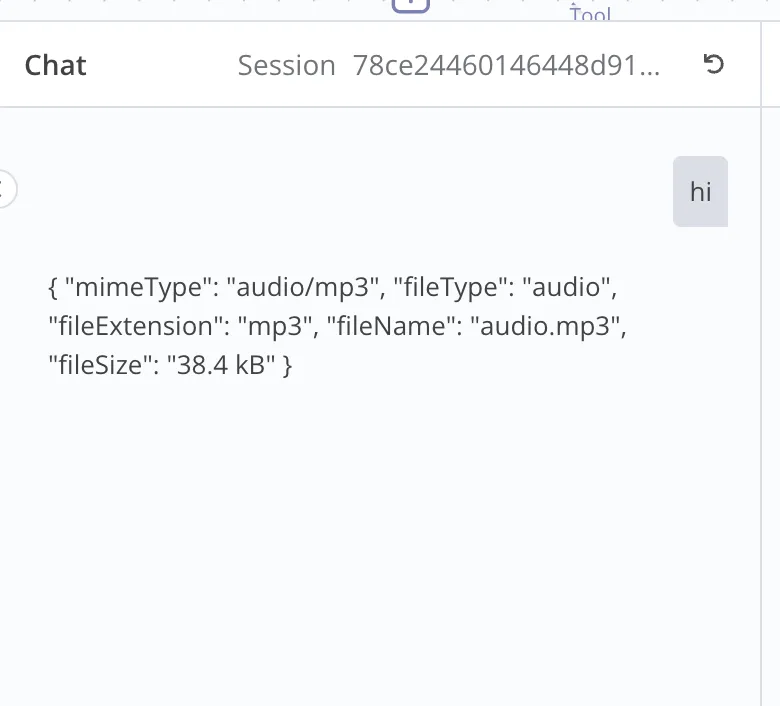
Handling Audio Playback in Chat Interface
One of the biggest limitations of our workflow is that the n8n hosted chat interface doesn’t natively support audio playback. When we return audio data from ElevenLabs, the chat interface only displays metadata about the file rather than rendering a playable audio element.
Consider integrating with platforms that natively support audio:
- Telegram Integration: Telegram has excellent support for voice messages. By replacing the Chat Trigger with a Telegram Trigger, your workflow can send voice responses directly to users through Telegram chatbot. However, this requires an HTTPS webhook URL, which means either:
- Using n8n Cloud
- Deploying to a server with HTTPS enabled
- Custom Frontend: For complete control, develop a custom frontend that communicates with your n8n workflow via webhooks and properly handles audio playback.
Error Handling
API calls can fail due to network issues, rate limiting, or invalid inputs, disrupting your workflow.
Consider implementing robust error handling:
- Add Error Trigger nodes to catch and process failures
- Use IF nodes to check for valid data before proceeding
- Implement fallback options (like returning just text if audio generation fails)
Processing Uploaded Files
If you’ve enabled file uploads in your Chat Trigger node, you can enhance your chatbot to process these files:
- For PDF Documents:
- Add an “Extract from File” node to extract text from PDFs
- Use this extracted text as additional context for the OpenAI node
- For Images:
- Implement a vision-capable model like GPT-4V
- Process images through Computer Vision APIs for description or analysis
- For Audio Files:
- Use OpenAI’s Whisper model to transcribe audio to text
- Process the transcribed text through your normal workflow
Processing uploaded files significantly expands what users can do with your chatbot, allowing them to ask questions about documents, analyze images, or transcribe speech.
Customising Voices and Response Styles
Personalise your chatbot’s personality and voice characteristics:

- Multiple Voice Options:
- Create a node that allows selecting different ElevenLabs voices
- Consider contextual voice selection based on content type
- Response Style Customisation:
- Modify your system prompt to adjust the chatbot’s personality
- Implement different “modes” for formal, casual, or technical responses
- Multilingual Support:
- Configure OpenAI to respond in different languages
- Select appropriate ElevenLabs voices for each language
These customisations make your chatbot more engaging and better suited to specific use cases or audiences.
Potential Applications
The combination of powerful language models and text-to-speech technology opens up numerous possibilities for practical applications. Here are some of the most promising use cases for your LLM chatbot with voice capabilities:
Customer Service Automation: Many businesses are already implementing similar solutions to handle first-level support, allowing human agents to focus on more complex problems that require empathy and creative problem-solving.
Accessibility Solutions: Voice-enabled chatbots can make information and services more accessible to various user groups to create audio versions of documents, articles, or other text content on demand. By integrating this technology into websites, applications, and services, organizations can ensure their digital offerings are accessible to a wider audience.
Personal Productivity: On an individual level, voice-enabled AI assistants can boost productivity by offering dictation capabilities with real-time feedback or serving as meeting assistants that can summarize discussions
By exploring these applications, you can adapt your basic n8n workflow to create specialized solutions that address specific needs across various industries and contexts. The versatility of combining LLMs with text-to-speech technology means that the potential applications are limited only by your imagination and the specific problems you aim to solve.