Seamless image compositing with SDXL and ComfyUI

Author
- Yao Chen(ORCID: 0009–0007–1385–3343)
Introduction
AI-generated images have become an important tool in the design field, but how to naturally merge people into the landscape background to make the picture look realistic and artistic has always been a challenge. From movie special effects to social media content creation, the technology of seamless synthesis is becoming more and more important.
In this exploration, Stable Diffusion XL (SDXL) and ComfyUI for AI synthesis were used to seamlessly blend selfies into the landscape background. Here are the main problems that need to be solved.
- How to let AI know where to put the characters?
- How to ensure that the light and shadow, and style are consistent, and there is no sense of disobedience or awkwardness?
- How to optimise the parameters of SDXL to make the image generation effect more natural?
- How to solve common technical problems in ComfyUI?
In this article, the complete ComfyUI workflow and an in-depth exploration on how to use Mask processing, Inpainting repair, ControlNet assistance and other technologies to make the final effect more realistic will be shared.
Task Overview
Our goal is to use ComfyUI + SDXL to achieve the following steps:
- Upload a photo of a person and a landscape background.
- Generate a Mask (automatically cut out the image).
- Adjust the size of the person and match it to the landscape.
- Use SDXL for style matching.
- Use Inpainting for fusion.
- Generate the final composite image.
The final output should be that the person blends seamlessly into the landscape, allowing AI to generate a natural, realistic composite image.
For the ComfyUI workflow, click this link.
Model Preparation
Load RealVisXL V5.0 Checkpoint
- Download link: Link
- File name:
realvisxlV50_v50LightningBakedvae.safetensors - Include Path: ComfyUI/models/checkpoints/
- Introduction: RealVisXL V5.0 LightningBakedVAE is a high-quality image generation model trained based on Stable Diffusion XL (SDXL), which is specially optimised for detail processing, style control, and colour performance. It combines the efficient VAE (Baked VAE) to provide faster inference speed and sharper image quality.
Load ControlNet Model(ControlNet-Union SDXL 1.0)
- Download link: Link
- File name: diffusion_pytorch_model_promax.safetensors
- Include Path: ComfyUI/models/controlnet/
- Introduction: ControlNet-Union SDXL 1.0 is a ControlNet extension model designed specifically for Stable Diffusion XL (SDXL) to provide more precise structural control for tasks such as posture control, depth mapping, edge detection, sketch generation, etc.
LayerMask: Load BiRefNet Model V2
- Download link: Link
- File name: Download the whole folder
- Include Path:
ComfyUI/models/ - Introduction: BiRefNet Model V2 is an AI model specifically designed for depth estimation. It can generate high-quality depth information for any input image.
Load CLIP Vision
- Download link: Link
- File name: model.safetensors(Rename it as CLIP-ViT-H-14-laion2B-s32B-b79K.safetensors)
- Include Path: /ComfyUI/models/clip_vision/
- Introduction: CLIP Vision is a key component of AI visual understanding, which enables AI to “understand” images and associate text information. It is widely used in AI-generated art, image classification, style matching, automatic annotation and other fields.
Load BiRefNet Ultra V2
- Download link: Link
- File name: Download all the files and put them into the folder vitmatte
- Include Path: ComfyUI/models/vitmatte
Load Depth Anything V2
- Download link: Link
- File name:
depth_anything_v2_vits.pth - Include Path: /ComfyUI/custom_nodes/comfyui_controlnet_aux/ckpts/depth-anything/Depth-Anything-V2-Small/
- Introduction: Depth Anything V2 — Relative is a depth estimation model that generates relative depth information for any input image. It can help AI identify the front and back relationship of objects and is used for tasks such as 3D perception, image generation, augmented reality (AR), and pose estimation. This model belongs to the Depth Anything series and is optimised for AI vision tasks such as Stable Diffusion, ControlNet, and ComfyUI.
Load Florence2 Model
- Download link: Link
- File name: Download all files and put them into Florence-2-base
- Include Path: ComfyUI/models/LLM
- Introduction: Florence-2 Model is a multi-modal visual model developed by Microsoft Research, optimised for image understanding, generation, detection, segmentation, and text description tasks.
IPAdapter Unified Loader
- Download link: Link
- File name:
ip-adapter-plus_sdxl_vit-h.safetensors - Include Path: /ComfyUI/models/ipadapter/
- Introduction: IPAdapter Unified Loader is an enhancement tool for IP-Adapter, which is used to load reference images more conveniently in Stable Diffusion / SDXL / ComfyUI, and let AI generate new images that match the reference style.
Introduction of the workflow
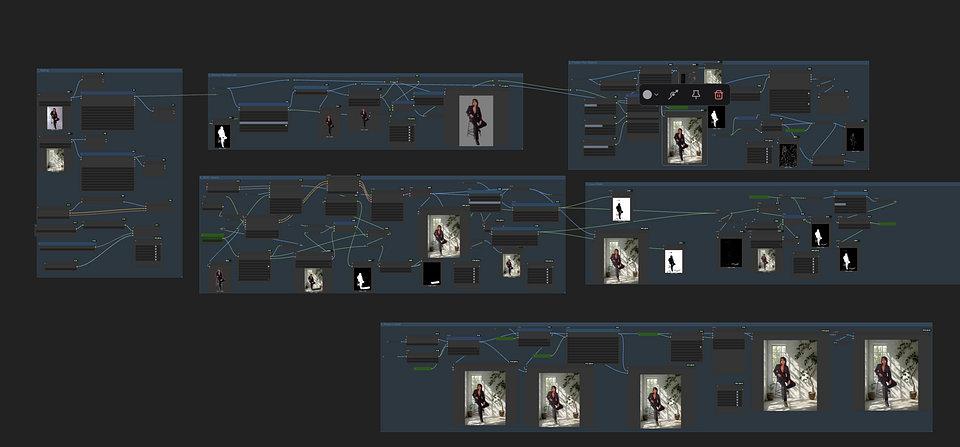
After you download all the models you need and put them into the right path, let’s come to the workflow.
Let’s say you have a portrait and you want to place your subject against a completely new background. The first step is to remove the existing background. This workflow is flexible enough to remove simple or complex backgrounds. Once the background is removed, the subject is repositioned into the new scene.
The real “magic” happens when we use the Lightning version of the SDXL model. The model is able to re-light and re-adjust the subject, ensuring that the light direction, highlights, and shadows match the new environment.
For example, if the original light came from the right, but the new scene is lit from the left, the SDXL model will adjust the subject’s lighting accordingly, making the subject look more natural and blend seamlessly with the shadows and highlights of the new background.
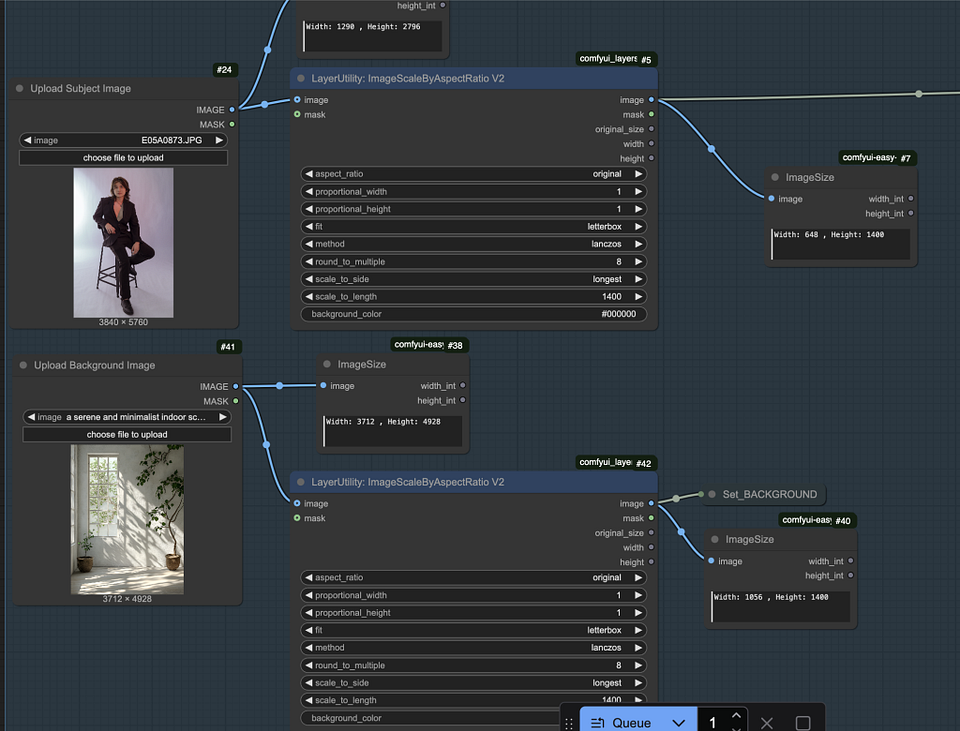
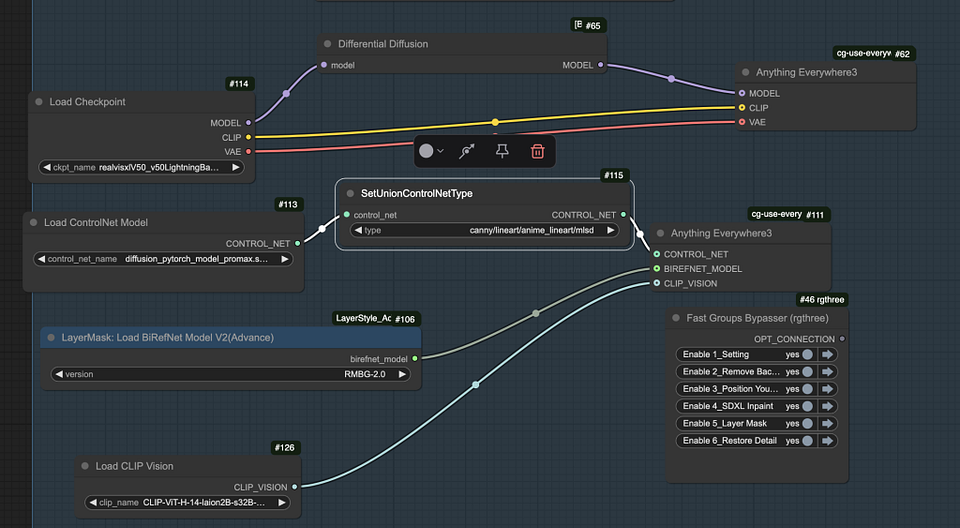
Nord Group 1: Load Models
In the first node group, our main task is to load the necessary models and prepare them for image processing. This step is very important because it lays the foundation for the entire workflow. Here are the specific steps:
- Upload the subject and background images: Import the subject and background images into the workflow. These images are the core components you will be working with.
- Constrain the image size: Use the node for constraining the image size to control the size of the image by adjusting the “scale_to_length” parameter.
- Load Checkpoint and ControlNet models: These models are important for structure and control.
- Set ControlNet type: Specify the type of ControlNet model you are using.
- Remove background using BiRefNet model: There are two versions of this model, and you can choose the one that best suits your needs.
- Integrate Clip vision model with IP-Adapter: In the following steps, the Clip vision model will be used in conjunction with the IP-Adapter, and this combination can effectively enhance the image processing capabilities of the workflow.
Node Group 2: Remove Background
In the second node group, our goal is to effectively remove the background of the subject image. This step is crucial to isolating the subject and preparing it to blend into the new background. Here are the steps:
- Perform background removal: Watch how the workflow accurately removes the background from the subject image. During this process, you need to ensure that it is clean and no unwanted elements are left.
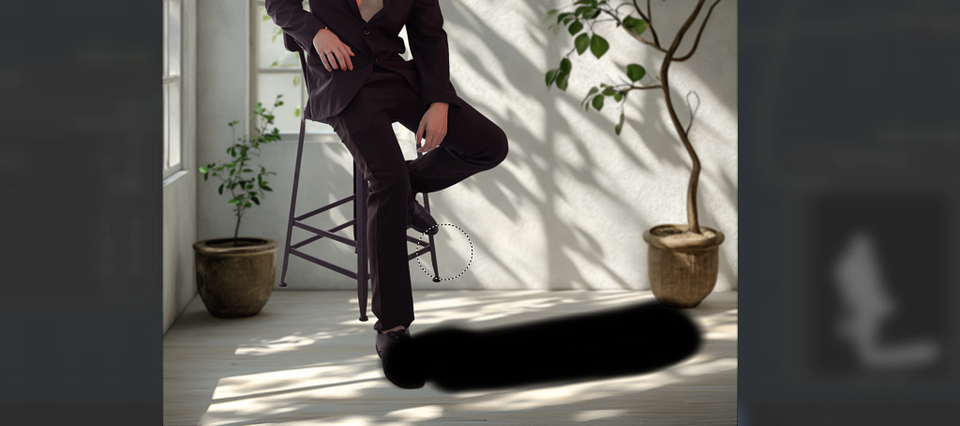
- Inspect and correct imperfections: After the initial removal, check for any remaining shadows or other imperfections, such as shadows under the subject’s shoes. These small details can affect the overall quality of the final image.
- Fine-tune with the “Preview Bridge” node: Make any necessary adjustments using the “Preview Bridge” node. This node can help you fine-tune and ensure that the removal is clean and there are no residues.
- Rerun the workflow: After making adjustments, run the workflow again to complete the background removal process.
- Complete background removal: After the background has been successfully removed, the subject image has been isolated and is ready for integration into a new scene.

Node Group 3: Subject Relocalisation, Prompt Words Generation, and Canny Edge Image Creation
In this node group, we will focus on positioning the subject against the new background and refining the overall look of the image. Here are the steps:
Step1. Subject Positioning
Adjust the subject’s position against the background with this node group. This step ensures that the subject is aligned seamlessly with the new scene.
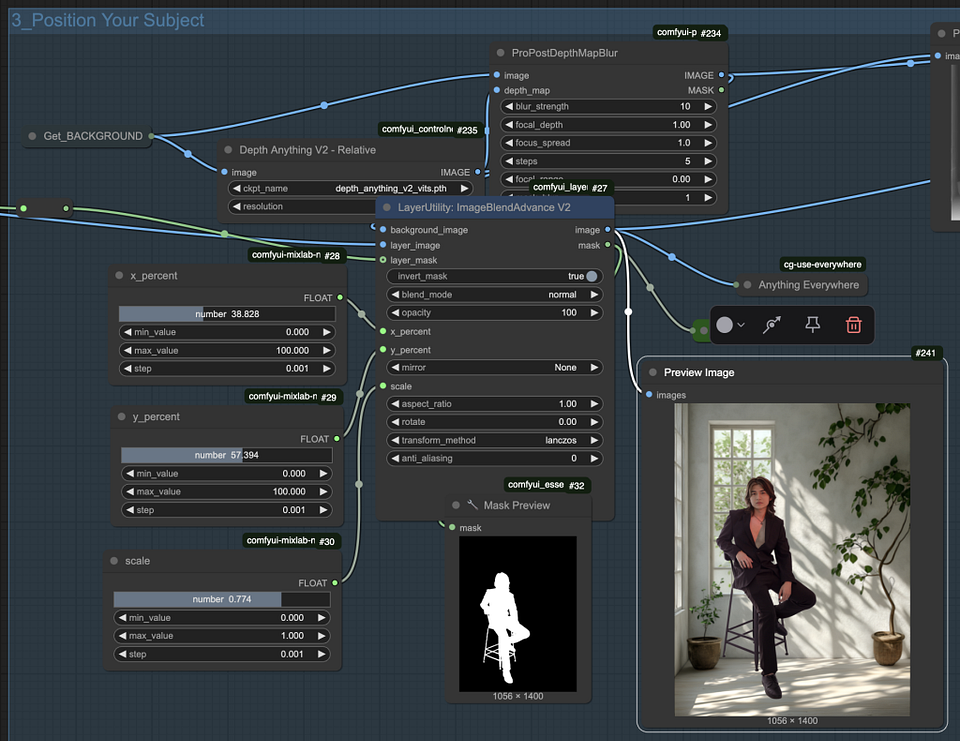
Step2. Blurring the background using depth map
- The background will be slightly blurred. This effect is achieved with the “ProPostDepthMapBlur” node, which blurs the image based on a depth map. Objects further away from the camera will appear blurrier, adding a sense of depth to the image.
- The depth map is created with the “Depth Anything” node, which is essential in determining how blurry different areas of the image will be.
- Adjust the “blur_strength” parameter to control the strength of the blur. By adjusting this setting, you can fine-tune the depth effect.

Step3. Automatically generate prompt words
Use the “Florence2Run” node to automatically generate a caption. If you need a more detailed caption, you can set the “task” parameter to “more_detailed_caption” to generate a longer, more descriptive caption.
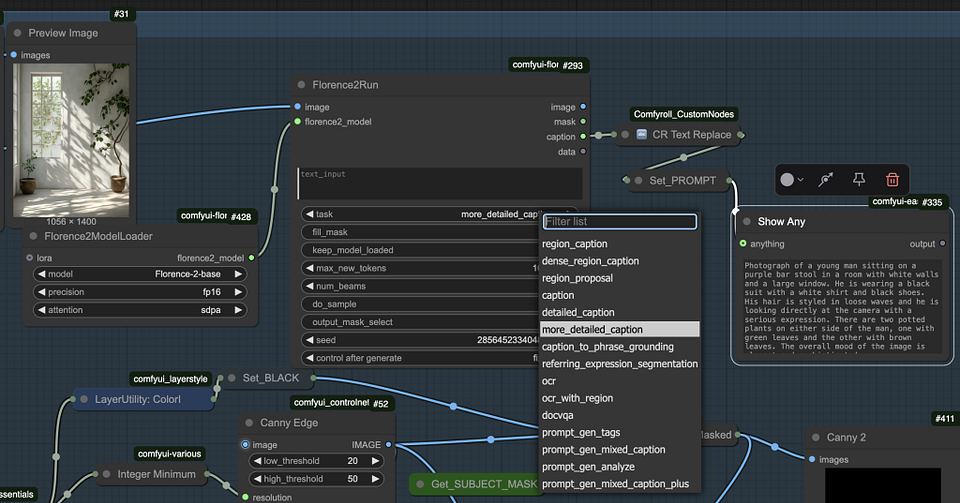
Step4. Canny edge image creation
Generate a Canny edge image to help control the outline of the subject. Reduce the threshold parameter until the outline of the subject becomes clear and distinct.

Node Group 4: Repaint and Shadow Adjustment
In this node group, we focus on redrawing to optimise the image, enhance the lighting and shadow effects, and ensure that the subject can blend naturally into the background. Here are the specific steps:
Step1. Image Redraw
Use this node group to redraw the image generated by the previous group. This step is essential for re-adjusting the lighting effects of the subject and creating shadows that help the subject blend naturally into the background.
Step2. Contrast and Adjust
Compare the newly generated image with the image from the previous group and notice the changes in highlights and shadows, which will make the picture look more harmonious. Although some original details may be lost, these details can be restored in the last group as long as the newly generated subject maintains the same outline as the original image.
Step3. Redraw Shadow Area:
Identify shadow needs on the floor around the subject. The initial redraw area may focus only on the subject, so it needs to be expanded to include the floor via a “Preview Bridge” node. This adjustment is critical to creating natural floor shadows.
Step4. Random processing
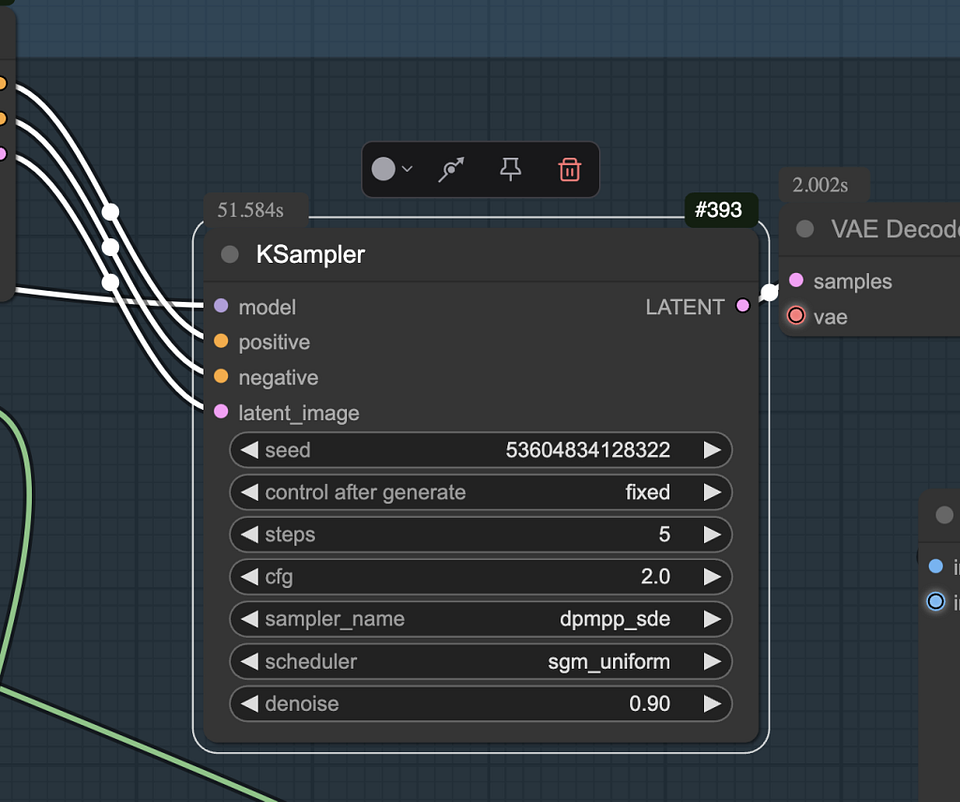
Run the workflow again after expanding the repainted area. Be prepared to change the seed in KSampler and try multiple iterations, as the shading will be different each time. Thanks to the Lightning version of the SDXL model, this process is very efficient, with only five sampling steps.
Step5. Resolve shadow inconsistencies:
If the shadows look broken or consistent with the original image, the problem may be that the Canny edges are limiting the shadow shape. To solve this problem, you can use the “Image Input Switch” node to select the outline of the subject as the outline image, which will form a more natural shadow.

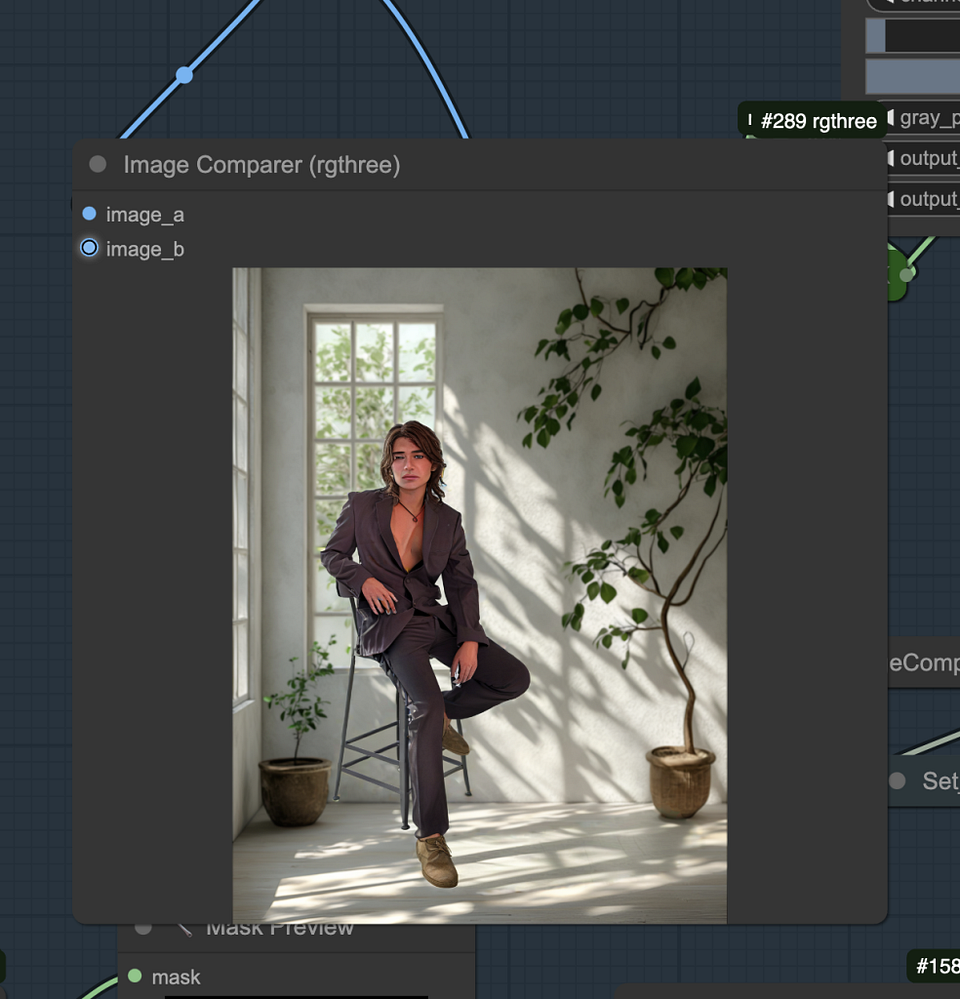
Step6.Run the Final workflow
Run the workflow again after making your adjustments. Observe how the shadows on the floor are evenly distributed, enhancing the realism of the image.
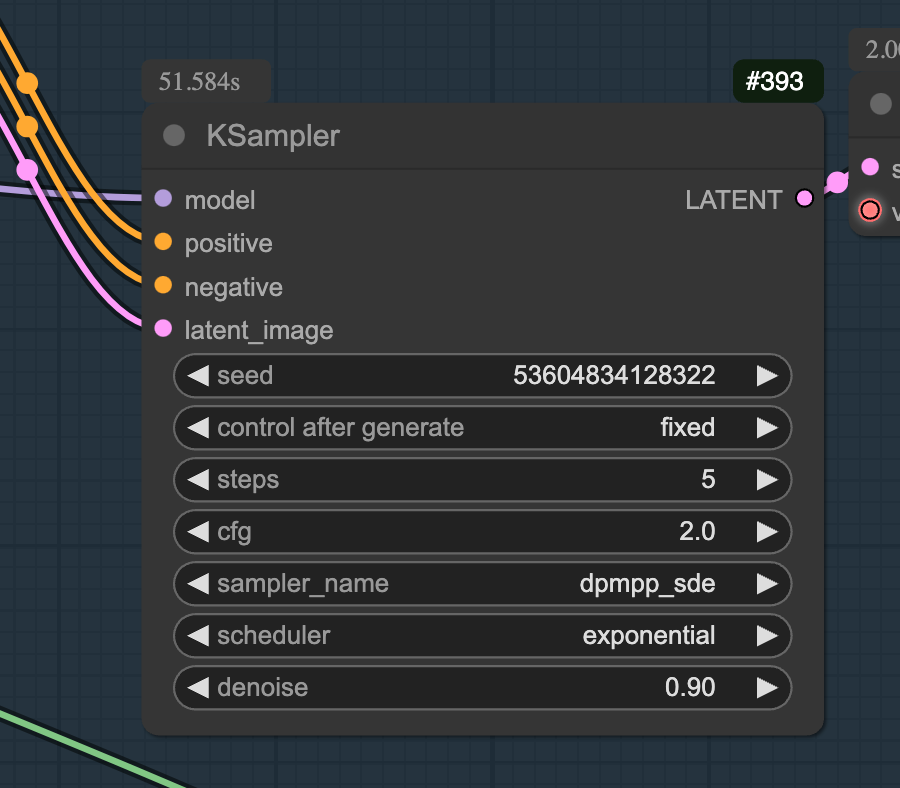
Recommended sampler and scheduler settings
Use the “dpmpp_sde” sampler and set the scheduler to “exponential” to ensure composition stability during processing.
By following the above steps, the subject can be naturally integrated into the new background, and the light and shadow effects can be greatly optimised.
Node Group 5: Creating and modifying shadow masks
In this final node group, we focus on generating and refining the shadow mask to improve the overall image quality. Here is a detailed description of the specific steps:
Step1. Generate an initial shadow mask
- A shadow mask is generated from the previous set of generated images using a specific node. This mask highlights the shadow areas in the image.
- Repeat the same process to create another shadow mask from the third set of generated images. This step ensures that the shadows are represented consistently across different stages.
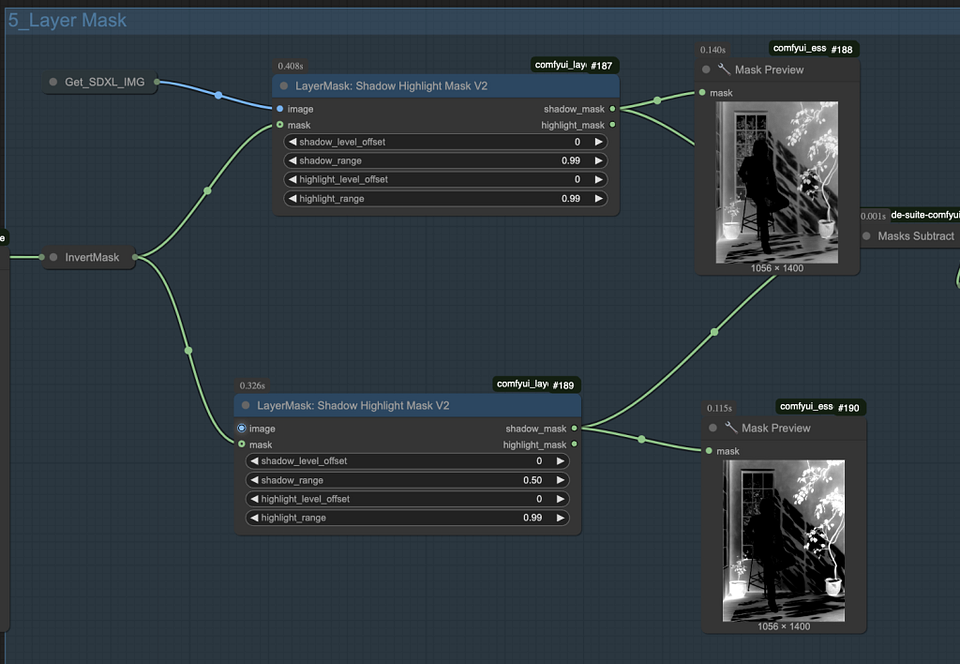
Step2. The subtraction operation produces an accurate mask
Performs a subtraction operation on the two resulting shadow masks. This operation results in a smaller shadow mask, allowing for more precise shadow adjustments.
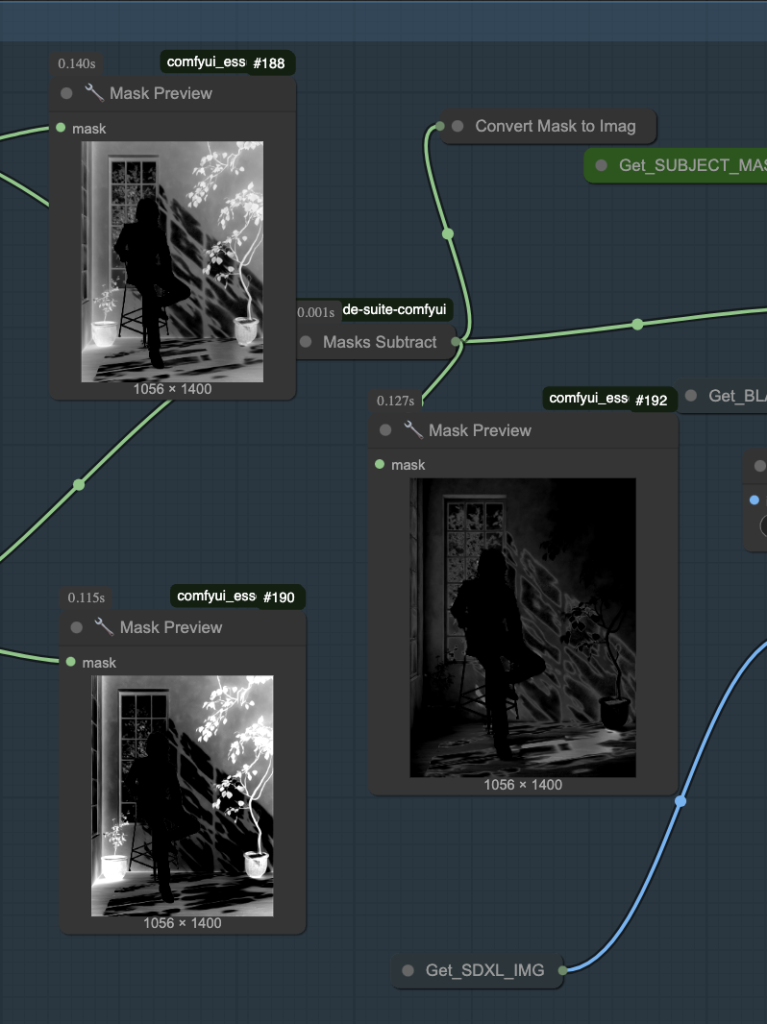
Step3. Modify the shadowmask
Use the Preview Bridge node to modify the shadow mask as needed. For example, if the mask accidentally covers certain areas on the floor, such as flower pots, you can manually paint to exclude those portions.

Step4. Enhanced shadow visibility
Use the Levels node to adjust the brightness of the shadow mask. By increasing the brightness of the mask, the shadows will be more prominent and noticeable in the final image, thus improving the realism of the image.

After making the adjustments above, you can create an optimised layer mask to enhance the shadows without affecting other elements of the image.
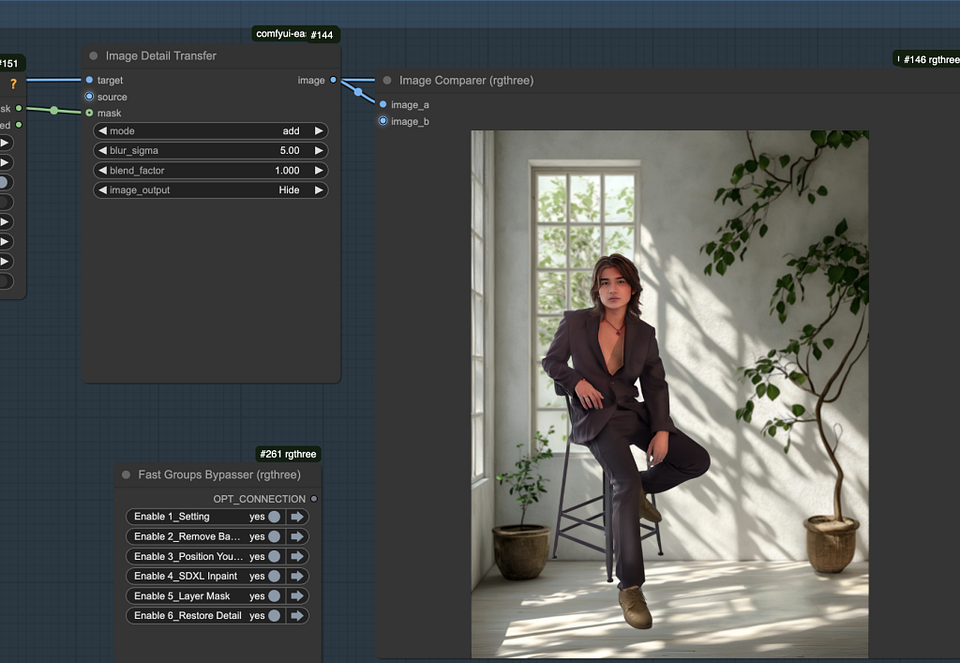
Node Group 6: Restoring Details and Adjusting Shadows
In this part, we aim to recover the details lost during the redraw process and fix the shadow blending problem. Here is a detailed guide of the steps:
Step1. Restore details via Image Detail Transfer
Use the Image Detail Transfer node to restore most of the details lost during the repaint process. This node requires two images and a mask: the destination image (with correct highlights and shadows) and the source image (with correct details). The subject mask limits the detail transfer to the subject.
Step2. Adjust shadow blending
If the shadows on the subject’s face are not blending evenly, adjust the Image Blur node’s blur_sigma or blur_radius values. This will help soften the shadows and make them more natural.
Step3. Solving the Floor Shadow Problem
If the shadows on the floor do not blend evenly due to fragmentation of the original shadows, be aware of the limitations of the Image Detail Transfer node, which cannot directly affect the background. This situation needs to be addressed separately through other methods.
Adjust the color using Color Blend: Use the Color Blend node to adjust the image colors to match the original image, ensuring the overall tone is consistent.
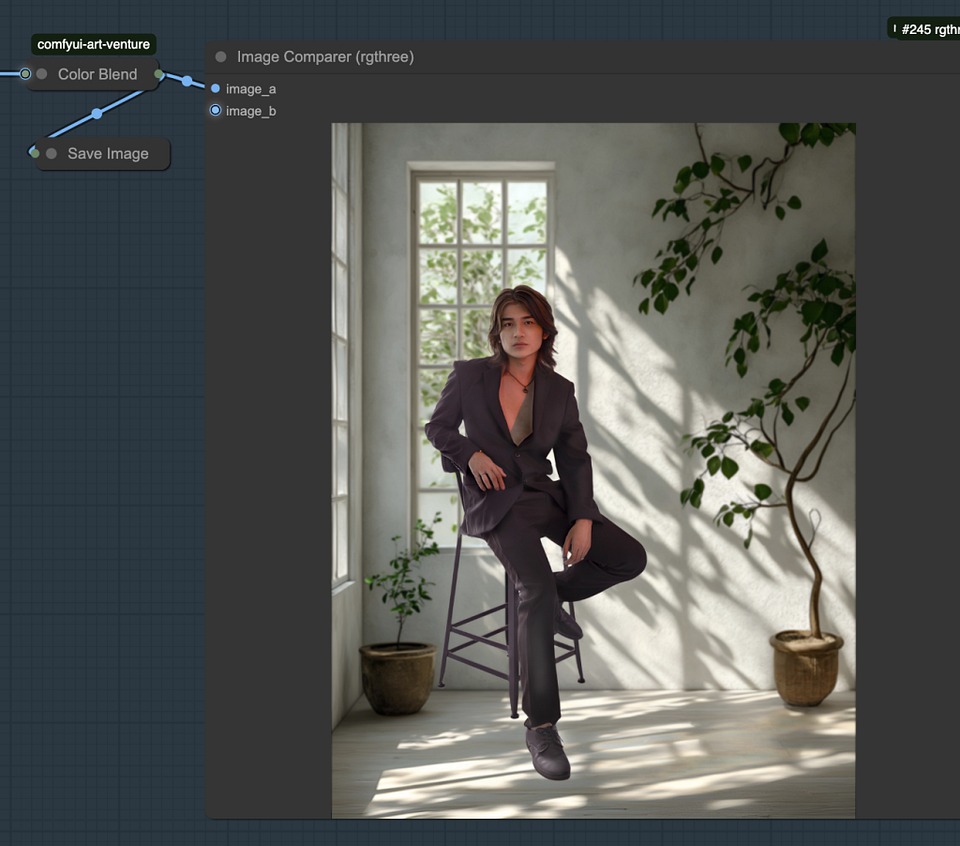
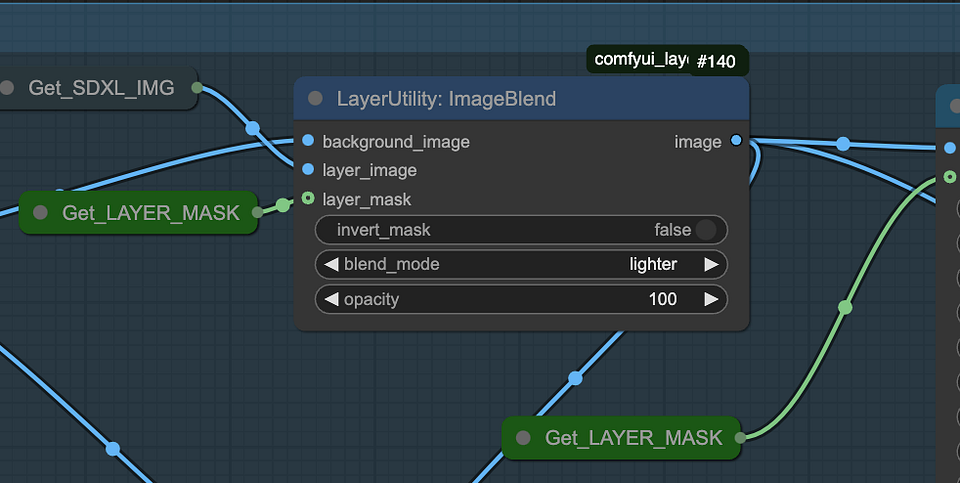
Creating shadows via ImageBlend: Use the ImageBlend node to blend the layer image with the background image. Set the blend mode to darker to darken specific areas and create shadows. The layer masks generated by the previous set define these shadow areas.

Step4. Recover highlights
Adjust the blending mode to “lighter” to restore highlights in the shadow areas. This step balances the shadows and highlights, thereby enhancing the depth and realism of the image.
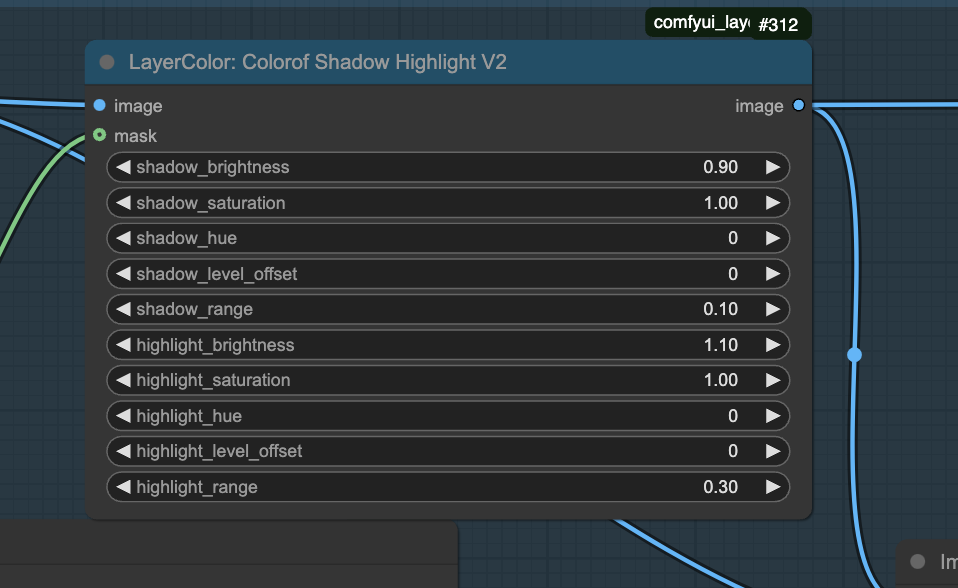
Step5. Fine-tune highlights and shadows
Use the following nodes to further adjust the highlights and shadows. Set shadow_brightness to less than 1 to darken the shadows, and highlight_brightness to more than 1 to enhance the highlights. Modify the range of shadows and highlights to achieve the desired effect.
By following these steps and techniques, you can significantly improve the shadow quality and overall performance of your images.
Conclusion
This workflow gives you the power to enhance your images, achieving realistic and more visually appealing results by effectively managing shadows and backgrounds. By following the steps and tips above, you can achieve satisfying results. Remember, the key to mastering this workflow is to experiment. Be bold and explore new ideas and push the boundaries of your creativity. Each attempt will bring you closer to discovering innovative techniques and effects.
The Medium version of this article can be found here.
References
Remove background: https://comfyui.org/en/remove-backgrounds-with-comfyui
Canny edge: https://www.runcomfy.com/comfyui-nodes/comfyui_controlnet_aux/CannyEdgePreprocessor
Shadowmask: https://www.runcomfy.com/comfyui-nodes/ComfyUI_LayerStyle/LayerMask–Shadow—Highlight-Mask